Head in the Cloud

Learning to Code at the Flatiron School

Drupal.org Hacked

| Comments

TechCrunch reports yesterday that Drupal.org’s server was hacked, exposing profile information such as username, email address, hashed password, and country. This incident highlights the importance of password security, a topic that I recently blogged about here.

As web consumers, it’s important that we do our part to make our passwords more secure. Some general rules to follow:
- Don’t use simple words or phrases as your password;
- Don’t use the same password on multiple sites or services;
- Use different types of characters - upper/lower case characters, numbers, and symbols.

You might also want to consider using a password manager to generate and manage strong and unique passwords. Some password manager services include 1Password, KeePass, LastPass, and RoboForm.

If there’s a password manager that you use and like, post it in the comments!

Strong Parameters and Mass Assignment in Rails 4

| Comments

One of the new features in Rails 4.0 is “Strong Parameters” (a gem) which moves mass assignment out of the model and into the controller.

Mass assignment allows multiple attributes of a class to be assigned simultanteously upon instantiation.

Sometimes you don’t want all attributes to be mass assign-able. To provide mass assignment protection, you can specify which attributes can be mass assigned using “attr_accessible” in the model.

Example:

class User < ActiveRecord::Base
    attr_accessible :name, :email
end

If you want to mass assign different attributes for different roles, you would specify what is attr_accessible for each role.

Example:

class User < ActiveRecord::Base
    attr_accessible :name, :email               # default role
    attr_accessible :eat_cake, :as => :admin    # admin role
end

There has been a lot of discussion within the community about whether mass assignment security belongs in the model layer. If an application has complex authorization requirements, adding separate code for each “role” can become cumbersome. Since the controller handles the flow between user and application including the authentication and authorization, it seems reasonable to move mass assignment protection into the controller.

DHH built the Strong Parameters gem to address this issue and as I mentioned at the beginning of the post, this feature is integrated in Rails 4.0 by default. Below is an example of how it could be implemented.

Example:

class UsersController < ApplicationController
  
  def update
    user = User.find(params[:id])
    if user.update_attributes(user_params)
      redirect_to home_path
    else
      render :edit
    end
  end
 
  private

  def user_params
    params.require(:user).permit(:name, :email)
  end

end

The ‘require’ method ensures that the specified key is available in the params hash and the ‘permit’ method specifies which attributes can be mass assigned.

To implement the mass assignment protection in the controller in Rails 3.2.x, you would need to install and require the Strong Parameters gem and then add the following code in addition to the code above:

In the config/application.rb file:

    config.active_record.whitelist_attributes = false

or just remove the code completely.

In the model:

    class User < ActiveRecord::Base
      include ActiveModel::ForbiddenAttributesProtection
    end

Drop, Create, Migrate

| Comments

Sometimes you need to wipe your database and start over.

In your rails console, type the following and hit enter:

rake db:drop && db:create && db:migrate

These commands will delete your existing database, create a new one, and run your migrations all in one line. Pretty handy.

Pass the Salt! Securing Passwords With Salting and Hashing

| Comments

If your application requires users to log in with their passwords and you are storing these passwords in a database, it’s important that you protect your users’ passwords in case of any security breaches.

First rule: passwords should never be stored in the database unencrypted (in plain text).

The best method to protect passwords is to employ salted password hashing.

Hashing is an algorithmic function that turns data into a fixed-length fingerprint that cannot be reversed. The advantage of hashing is that if the input changes by even one character, the resulting hash is completely different.

Example:

After a password has been hashed, the hash is stored in the database. When the user logs in, the hash of the password they entered is verified against the hash of the password in the database. If the hashes match then the user is granted access.

Hashing a password, however, still does not provide adequate protection. It’s possible to crack hashes by guessing at passwords, hashing those guesses, and then checking if the guess hashes are equal to the hashed password. These guess methods are commonly called dictionary attacks and brute-force attacks.

A dictionary attack uses a list of words, phrases, and common passwords that are hashed and then compared to the password hash. A brute force attack tries every possible combination of characters up to a certain length.

These attack methods work because every password is hashed the exact same way. Users with the same password would have the same password hashes. To prevent these attacks from successfully gaining access to user passwords, the hashes should be randomized by either appending or prepending a random string called a salt to the password before it is hashed.

Example:

Salting turns the same password into a completely different hash each time. In order to verify that the password a user enters is correct, the salt needs to be stored in the database along with the hash. It’s important that the same salt is NOT used for each hash. A salt should be random and not too short in length. When a user creates an account or changes their password, a new random should be generated.

Getting Git

| Comments

Since working on our group project a couple of weeks ago, I’ve gotten more familiar with using Git. After suffering through some painful merging of branches into master, I have learned some important lessons of what to do (e.g., make sure your local master is up to date before rebasing and merging branches!) and what not to do (e.g., panic and type arbitrary git commands during a rebase!)

Here are 10 steps for Git success (for branching and merging):

1) Before branching, make sure your local master is up to date with remote master.

git pull origin master

2) Create and check out a new branch.

git checkout -b [NAME_OF_FEATURE_BRANCH]

3) Do all your work on this branch. Once your branch is complete, commit all of your changes and push them to the branch.

git commit -am "helpful commit message!"

4) Check out master and make sure that your local master is up to date with the latest changes on master.

git pull origin master

5) Check out your feature branch.

git co [FEATURE_BRANCH]

6) From your feature branch, rebase master onto the feature branch.

git rebase master

7) Resolve all conflicts on the feature branch. After resolving conflicts in your files, add your changes and continue the rebase.

git add .
git rebase --continue

8) Once the rebase is complete, check out master.

git co master

9) Merge feature branch into master.

git merge [FEATURE_BRANCH]

10) Double check that all conflicts have been resolved and that your code is working properly. If everything looks good, push the merge to remote master.

git push origin master

Some additional thoughts on good practices:
- Keep remote master clean. Write any new code on branches.
- Don’t branch off a feature branch. You should generally branch off master.
- Don’t merge a branch into master until the feature is fully complete.
- Keep your changes small so that you don’t spend too much time working on the same branch.
- Write succinct but descriptive commit messages.
- Once your branch is complete and merged, any new work should be done on a new branch.

Equal Operators: The Case of Mistaken Identity in JS

| Comments

A little tidbit I learned about Javascript and the equal operator:

’=’ denotes assignment.

Example: var x = 10;

’==’ compares two values and returns a boolean (true or false).

Example: 10 == ‘10’ // returns true

’===’ compares both the values AND the type of the data.

Example: 10 === ‘10’ // returns false

It’s important to know which operator to use to get the results you expect!

Who You Callin’ a Foo?!

| Comments

Searching for the Origins of “foobar”

While reading programming books and online resources, I often come across the all-purpose placeholder terms “foo”, “bar”, and “baz” in code examples. For the non-programmers out there, these terms are used to name entities such as variables, functions, and commands in order to demonstrate a concept.

I was curious about the origins of these terms and did some investigative research (i.e. looked it up on Wikipedia). What I found was pretty interesting.

Foo first originated as a nonsense word in the 1930s when it appeared in a comic called Smokey Stover by Bill Holman who stated that he used the word after seeing it on the bottom of a jade figurine in Chinatown, San Francisco. The Chinese word transliterated as “fu” means good luck.

The term then evolved into military slang in the 1940s, merging with the term FUBAR, which stands for “F**ked Up Beyond All Repair.” During WWII, the term ‘foo fighters’ was used to describe UFOs (so that’s where the Foo Fighters got its name!).

The use of foo in a programming context may have begun in the 1960s by the Tech Model Railroad Club (TMRC), a student organization that built model trains and systems. The term foobar first appeared in system manuals by Digital Equipment Corporation in the 1960s and early 1970s.

The exact relationships between foo, FUBAR, and foo/bar in a programming context are not known with certainty but anecdotal theories abound. You can learn more about the etymology of foo in the Internet Engineering Task Force (IETF) RFC 3092. It’s pretty interesting reading.

Setting a Default Version of Ruby

| Comments

Have you ever experienced the problem of using your Terminal to run some Ruby code only to realize that you’re not using the version of Ruby that you want? And although you have the latest version installed, Terminal somehow keeps mysteriously reverting to a different version?

I came across this issue a couple of weeks ago and learned that it’s good practice to explicitly set a default version of Ruby to avoid unexpected results. This is where the Ruby Version Manager (RVM), a tool for installing and managing several different versions and implementations of Ruby on one computer, comes in really handy.

Once you have RVM installed, go into your terminal and type “rvm list” to see all the versions of Ruby that are installed on your computer.

The output also tells you what version you’re currently using and what the default version is if there is one set.

To set a specific version of Ruby, say the latest version (currently 1.9.3-p374), as your default, type:

rvm use ruby-1.9.3-p374 --default

You can always change the current version that you’re using or the default by repeating these steps.

How to Scrape and Email Recipes From Epicurious.com

| Comments

Last week, I presented at the NYC on Rails Meetup on the topic of data/messaging mashups. A common mashup pattern combines a data source with a messaging service (Twitter, e-mail, etc). For the presentation, I wrote a script that scrapes and emails the recipe of the day from Epicurious.com. This post summarizes the steps of how I did it.

Basic Steps

Download Gems and APIs

To get the content of the recipes, I used the Nokogiri gem which allows you to parse HTML by searching documents via CSS selectors. To send the recipe in an email, I used the Postmark API. The “open-uri” library is also required to open up links.

Identify the CSS selector for “Recipe of the Day” element

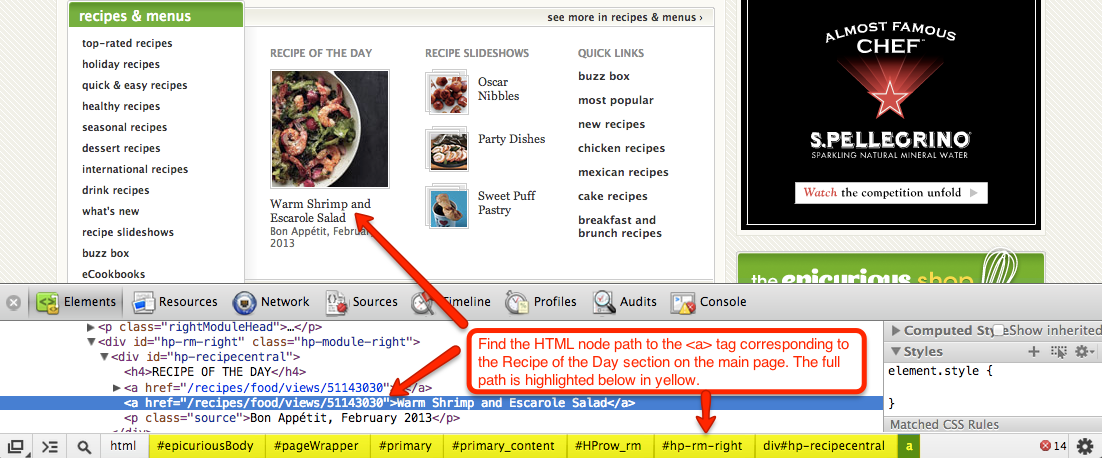
Using the inspect tool in my browser, I found the appropriate CSS selector and HTML node path that corresponds to the link to the Recipe of the Day. To get the actual link of the recipe, I needed the HREF attribute of the “a” tag. Since that is a relative path to the recipe page, I needed to concatenate the homepage url (www.epicurious.com) with the relative path (/recipes/food/views/51143030).

Parse HTML from Recipe Page

The basic structure of each recipe page is the same. I only wanted the most important components of the recipe - the name, image, yield, ingredients, and preparation instructions - to be included in the email. Similar to the above step, I used the inspector tool to identify the corresponding node and CSS selector for each recipe component.

An important thing to note is that the CSS method returns an array of XML element objects (see image below) and not just the text itself. I used the “text” method to convert these elements into human readable format.

Create HTML String Variable for Email Body

After gathering all the relevant components of the recipe page, I used HTML syntax to describe the structure of the email body. To marry the email structure with the actual recipe content, I created a (rather large) HTML string variable as shown below.

self.content = "<h2>" + recipe_name + "</h2>"
self.content += "<img src=" + recipe_image + "><br>"
self.content += "<br><a href='#{url}' target='_blank'>" + recipe_url + "</a>"
self.content += "<br><h3>Yield: </h3><p>" + recipe_servings + "</p>"
self.content += "<h3>Ingredients:</h3>"
self.content += "<ul>"

ingredients.each do |ingredient|
  self.content += "<li>" + ingredient.to_s + "</li>"
end

self.content += "</ul>"
self.content += "<h3>Preparation:</h3>"

instructions.each do |instruction|
  self.content += "<p>" + instruction.to_s + "</p>"
end

My full code can be accessed here.

While writing this script, I found the following resources extremely helpful:

Happy Cooking!

Why I’m Learning to Code

| Comments

Up until recently, my experience with technology has primarily been as a consumer and end user. Whenever I interact with a beautifully designed website or a user friendly application, it would fill me with awe and wonder. “How was this made? How does it do what it does? It must be magic!”

I also often think, “It would be great if there was an app that could do x, y or z,” or “This tool would be so much easier to use if… blah blah blah.”

Those thoughts and ideas eventually evolved into the desire to take the initiative to learn to build products myself. And that has led me to The Flatiron School where I am today, learning to code and demystifying the magical powers of the Internet and technology. My goal for the next three months is to learn as much as I can and go on to help create something that will make a positive difference in the world.